C++学习笔记
一、基础知识
1、goto 语句(不建议使用)
作用: 可以无条件的跳转语句
语法: goto 标记;
解释: 如果标记的名称存在,执行到goto语句时,会跳转到标记的位置
1
2
3
4
5
6
7
8
9
10
| int main() {
cout << 1 << endl;
cout << 2 << endl;
goto FLAG;
cout << 3 << endl;
cout << 4 << endl;
FLAG:
cout << 5 << endl;
return 0;
}
|
2、一维数组
一维数组名称的用途
- 可以统计整个数组在内存中的长度
- 可以获取数组在内存中的首地址
示例:
1
2
3
4
5
6
7
8
9
10
11
12
13
14
15
16
17
18
19
20
21
22
| int main() {
int arr[10] = { 1,2,3,4,5,6,7,8,9,10 };
cout << "整个数组所占内存空间为: " << sizeof(arr) << endl;
cout << "每个元素所占内存空间为: " << sizeof(arr[0]) << endl;
cout << "数组的元素个数为: " << sizeof(arr) / sizeof(arr[0]) << endl;
cout << "数组首地址为: " << (int)arr << endl;
cout << "数组中第一个元素地址为: " << (int)&arr[0] << endl;
cout << "数组中第二个元素地址为: " << (int)&arr[1] << endl;
system("pause");
return 0;
}
|
注意:数组名是常量,不可以赋值
总结1:直接打印数组名,可以查看数组所占内存的首地址
总结2:对数组名进行sizeof,可以获取整个数组占内存空间的大小
3、二维数组
二维数组定义的四种方式:
数据类型 数组名[ 行数 ][ 列数 ];数据类型 数组名[ 行数 ][ 列数 ] = { {数据1,数据2 } ,{数据3,数据4 } };数据类型 数组名[ 行数 ][ 列数 ] = { 数据1,数据2,数据3,数据4};数据类型 数组名[ ][ 列数 ] = { 数据1,数据2,数据3,数据4};
1
2
3
4
5
6
7
8
9
10
11
12
13
14
15
16
17
18
19
20
21
22
23
24
25
26
27
28
| int main() {
int arr[2][3] =
{
{1,2,3},
{4,5,6}
};
cout << "二维数组大小: " << sizeof(arr) << endl;
cout << "二维数组一行大小: " << sizeof(arr[0]) << endl;
cout << "二维数组元素大小: " << sizeof(arr[0][0]) << endl;
cout << "二维数组行数: " << sizeof(arr) / sizeof(arr[0]) << endl;
cout << "二维数组列数: " << sizeof(arr[0]) / sizeof(arr[0][0]) << endl;
cout << "二维数组首地址:" << arr << endl;
cout << "二维数组第一行地址:" << arr[0] << endl;
cout << "二维数组第二行地址:" << arr[1] << endl;
cout << "二维数组第一个元素地址:" << &arr[0][0] << endl;
cout << "二维数组第二个元素地址:" << &arr[0][1] << endl;
system("pause");
return 0;
}
|
总结1:二维数组名就是这个数组的首地址
总结2:对二维数组名进行sizeof时,可以获取整个二维数组占用的内存空间大小
4、函数中的值传递
- 所谓值传递,就是函数调用时实参将数值传入给形参
- 值传递时,如果形参发生,并不会影响实参(注意:和Java中不同)
1
2
3
4
5
6
7
8
9
10
11
12
13
14
15
16
17
18
19
20
21
22
23
24
25
26
27
28
29
30
31
| void swap(int num1, int num2)
{
cout << "交换前:" << endl;
cout << "num1 = " << num1 << endl;
cout << "num2 = " << num2 << endl;
int temp = num1;
num1 = num2;
num2 = temp;
cout << "交换后:" << endl;
cout << "num1 = " << num1 << endl;
cout << "num2 = " << num2 << endl;
}
int main() {
int a = 10;
int b = 20;
swap(a, b);
cout << "mian中的 a = " << a << endl;
cout << "mian中的 b = " << b << endl;
system("pause");
return 0;
}
|
总结: 值传递时,形参是修饰不了实参的
5、函数的声明
作用: 告诉编译器函数名称及如何调用函数。函数的实际主体可以单独定义。
(在C中,如果不自定义函数在main方法之后定义,如果main方法调用了此函数,则main方法找不到此函数,因此需要提前声明)
和Java中不同
6、函数的分文件编写
作用: 让代码结构更加清晰
函数分文件编写一般有4个步骤
创建后缀名为.h的头文件
创建后缀名为.cpp的源文件
在头文件中写函数的声明
在源文件中写函数的定义
示例:
1
2
3
4
5
6
7
8
9
10
11
12
13
14
15
16
17
18
19
20
21
22
23
24
25
26
27
28
29
30
|
#include<iostream>
using namespace std;
void swap(int a, int b);
#include "swap.h"
void swap(int a, int b)
{
int temp = a;
a = b;
b = temp;
cout << "a = " << a << endl;
cout << "b = " << b << endl;
}
#include "swap.h"
int main() {
int a = 100;
int b = 200;
swap(a, b);
system("pause");
return 0;
}
|
7、指针
7.1 指针的基本概念
指针的作用: 可以通过指针间接访问内存
- 内存编号是从0开始记录的,一般用十六进制数字表示
- 可以利用指针变量保存地址
7.2 指针变量的定义和使用
指针变量定义语法: 数据类型 * 变量名;
示例:
1
2
3
4
5
6
7
8
9
10
11
12
13
14
15
16
17
18
19
20
21
| int main() {
int a = 10;
int * p;
p = &a;
cout << &a << endl;
cout << p << endl;
cout << "*p = " << *p << endl;
system("pause");
return 0;
}
|
指针变量和普通变量的区别
- 普通变量存放的是数据,指针变量存放的是地址
- 指针变量可以通过” * “操作符,操作指针变量指向的内存空间,这个过程称为解引用
总结1: 我们可以通过 & 符号 获取变量的地址
总结2:利用指针可以记录地址
总结3:对指针变量解引用,可以操作指针指向的内存
7.3 指针所占内存空间
提问:指针也是种数据类型,那么这种数据类型占用多少内存空间?
示例:
1
2
3
4
5
6
7
8
9
10
11
12
13
14
15
16
17
| int main() {
int a = 10;
int * p;
p = &a;
cout << *p << endl;
cout << sizeof(p) << endl;
cout << sizeof(char *) << endl;
cout << sizeof(float *) << endl;
cout << sizeof(double *) << endl;
system("pause");
return 0;
}
|
总结:所有指针类型在32位操作系统下是4个字节,64位操作系统为8个字节
7.4 空指针和野指针
空指针:指针变量指向内存中编号为0的空间
用途: 初始化指针变量
注意: 空指针指向的内存是不可以访问的
示例1:空指针
1
2
3
4
5
6
7
8
9
10
11
12
13
| int main() {
int * p = NULL;
cout << *p << endl;
system("pause");
return 0;
}
|
野指针:指针变量指向非法的内存空间
示例2:野指针
1
2
3
4
5
6
7
8
9
10
11
12
| int main() {
int * p = (int *)0x1100;
cout << *p << endl;
system("pause");
return 0;
}
|
总结:空指针和野指针都不是我们申请的空间,因此不要访问。
7.5 const修饰指针
const修饰指针有三种情况
const修饰指针 — 常量指针
const修饰常量 — 指针常量
const既修饰指针,又修饰常量
示例:
1
2
3
4
5
6
7
8
9
10
11
12
13
14
15
16
17
18
19
20
21
22
23
24
25
| int main() {
int a = 10;
int b = 10;
const int * p1 = &a;
p1 = &b;
int * const p2 = &a;
*p2 = 100;
const int * const p3 = &a;
system("pause");
return 0;
}
|
技巧:看const右侧紧跟着的是指针还是常量, 是指针就是常量指针,是常量就是指针常量
7.6 指针和数组
作用: 利用指针访问数组中元素
示例:
1
2
3
4
5
6
7
8
9
10
11
12
13
14
15
16
17
18
19
20
| int main() {
int arr[] = { 1,2,3,4,5,6,7,8,9,10 };
int * p = arr;
cout << "第一个元素: " << arr[0] << endl;
cout << "指针访问第一个元素: " << *p << endl;
for (int i = 0; i < 10; i++)
{
cout << *p << endl;
p++;
}
system("pause");
return 0;
}
|
7.7 指针和函数
作用: 利用指针作函数参数,可以修改实参的值(和前边形参相反)
示例:
1
2
3
4
5
6
7
8
9
10
11
12
13
14
15
16
17
18
19
20
21
22
23
24
25
26
27
28
29
30
31
|
void swap1(int a ,int b)
{
int temp = a;
a = b;
b = temp;
}
void swap2(int * p1, int *p2)
{
int temp = *p1;
*p1 = *p2;
*p2 = temp;
}
int main() {
int a = 10;
int b = 20;
swap1(a, b);
swap2(&a, &b);
cout << "a = " << a << endl;
cout << "b = " << b << endl;
system("pause");
return 0;
}
|
总结:如果不想修改实参,就用值传递,如果想修改实参,就用地址传递
7.8 指针、数组、函数
案例描述: 封装一个函数,利用冒泡排序,实现对整型数组的升序排序
例如数组:int arr[10] = { 4,3,6,9,1,2,10,8,7,5 };
示例:
1
2
3
4
5
6
7
8
9
10
11
12
13
14
15
16
17
18
19
20
21
22
23
24
25
26
27
28
29
30
31
32
33
34
35
36
37
38
39
|
void bubbleSort(int * arr, int len)
{
for (int i = 0; i < len - 1; i++)
{
for (int j = 0; j < len - 1 - i; j++)
{
if (arr[j] > arr[j + 1])
{
int temp = arr[j];
arr[j] = arr[j + 1];
arr[j + 1] = temp;
}
}
}
}
void printArray(int arr[], int len)
{
for (int i = 0; i < len; i++)
{
cout << arr[i] << endl;
}
}
int main() {
int arr[10] = { 4,3,6,9,1,2,10,8,7,5 };
int len = sizeof(arr) / sizeof(int);
bubbleSort(arr, len);
printArray(arr, len);
system("pause");
return 0;
}
|
8、结构体
8.1 结构体基本概念
结构体属于用户 自定义的数据类型,允许用户存储不同的数据类型
(跟Java中的对象比较像,但是只有属性,没有方法。下面其他的结构体使用,都可以类比Java中对象的使用)
8.2 结构体定义和使用
语法: struct 结构体名 { 结构体成员列表 };
通过结构体创建变量的方式有三种:
示例:
1
2
3
4
5
6
7
8
9
10
11
12
13
14
15
16
17
18
19
20
21
22
23
24
25
26
27
28
29
30
31
32
33
34
35
36
37
38
|
struct student
{
string name;
int age;
int score;
}stu3;
int main() {
struct student stu1;
stu1.name = "张三";
stu1.age = 18;
stu1.score = 100;
cout << "姓名:" << stu1.name << " 年龄:" << stu1.age << " 分数:" << stu1.score << endl;
struct student stu2 = { "李四",19,60 };
cout << "姓名:" << stu2.name << " 年龄:" << stu2.age << " 分数:" << stu2.score << endl;
stu3.name = "王五";
stu3.age = 18;
stu3.score = 80;
cout << "姓名:" << stu3.name << " 年龄:" << stu3.age << " 分数:" << stu3.score << endl;
system("pause");
return 0;
}
|
总结1:定义结构体时的关键字是struct,不可省略
总结2:创建结构体变量时,关键字struct可以省略
总结3:结构体变量利用操作符 ‘’.’’ 访问成员
8.3 结构体数组
作用: 将自定义的结构体放入到数组中方便维护
语法: struct 结构体名 数组名[元素个数] = { {} , {} , ... {} }
示例:
1
2
3
4
5
6
7
8
9
10
11
12
13
14
15
16
17
18
19
20
21
22
23
24
25
26
27
28
|
struct student
{
string name;
int age;
int score;
}
int main() {
struct student arr[3]=
{
{"张三",18,80 },
{"李四",19,60 },
{"王五",20,70 }
};
for (int i = 0; i < 3; i++)
{
cout << "姓名:" << arr[i].name << " 年龄:" << arr[i].age << " 分数:" << arr[i].score << endl;
}
system("pause");
return 0;
}
|
8.4 结构体指针
作用: 通过指针访问结构体中的成员
示例:
1
2
3
4
5
6
7
8
9
10
11
12
13
14
15
16
17
18
19
20
21
22
23
24
|
struct student
{
string name;
int age;
int score;
};
int main() {
struct student stu = { "张三",18,100, };
struct student * p = &stu;
p->score = 80;
cout << "姓名:" << p->name << " 年龄:" << p->age << " 分数:" << p->score << endl;
system("pause");
return 0;
}
|
总结:结构体指针可以通过 -> 操作符 来访问结构体中的成员
8.5 结构体嵌套结构体
作用: 结构体中的成员可以是另一个结构体
例如: 每个老师辅导一个学员,一个老师的结构体中,记录一个学生的结构体
示例:
总结: 在结构体中可以定义另一个结构体作为成员,用来解决实际问题
8.6 结构体做函数参数
作用: 将结构体作为参数向函数中传递
传递方式有两种:
示例:
1
2
3
4
5
6
7
8
9
10
11
12
13
14
15
16
17
18
19
20
21
22
23
24
25
26
27
28
29
30
31
32
33
34
35
36
37
38
39
40
|
struct student
{
string name;
int age;
int score;
};
void printStudent(student stu )
{
stu.age = 28;
cout << "子函数中 姓名:" << stu.name << " 年龄: " << stu.age << " 分数:" << stu.score << endl;
}
void printStudent2(student *stu)
{
stu->age = 28;
cout << "子函数中 姓名:" << stu->name << " 年龄: " << stu->age << " 分数:" << stu->score << endl;
}
int main() {
student stu = { "张三",18,100};
printStudent(stu);
cout << "主函数中 姓名:" << stu.name << " 年龄: " << stu.age << " 分数:" << stu.score << endl;
cout << endl;
printStudent2(&stu);
cout << "主函数中 姓名:" << stu.name << " 年龄: " << stu.age << " 分数:" << stu.score << endl;
system("pause");
return 0;
}
|
总结:如果不想修改主函数中的数据,用值传递,反之用地址传递
8.7 结构体中 const使用场景
作用: 用const来防止误操作
示例:
1
2
3
4
5
6
7
8
9
10
11
12
13
14
15
16
17
18
19
20
21
22
23
24
25
26
27
|
struct student
{
string name;
int age;
int score;
};
void printStudent(const student *stu)
{
cout << "姓名:" << stu->name << " 年龄:" << stu->age << " 分数:" << stu->score << endl;
}
int main() {
student stu = { "张三",18,100 };
printStudent(&stu);
system("pause");
return 0;
}
|
二、核心编程
C++中的面向对象编程(笑)
1、内存分区模型
C++程序在执行时,将内存大方向划分为4个区域
代码区:存放函数体的二进制代码,由操作系统进行管理的
全局区:存放全局变量和静态变量以及常量
栈区:由编译器自动分配释放, 存放函数的参数值,局部变量等
堆区:由程序员分配和释放,若程序员不释放,程序结束时由操作系统回收
内存四区意义:
不同区域存放的数据,赋予不同的生命周期, 给我们更大的灵活编程
1.1 程序运行前
在程序编译后,生成了exe可执行程序,未执行该程序前分为两个区域
代码区:
- 存放 CPU 执行的机器指令
- 代码区是共享的,共享的目的是对于频繁被执行的程序,只需要在内存中有一份代码即可
- 代码区是只读的,使其只读的原因是防止程序意外地修改了它的指令
全局区:
- 全局变量和静态变量存放在此
- 全局区还包含了常量区, 字符串常量和其他常量也存放在此
-
示例:
1
2
3
4
5
6
7
8
9
10
11
12
13
14
15
16
17
18
19
20
21
22
23
24
25
26
27
28
29
30
31
32
33
34
35
36
37
38
39
40
41
42
43
|
int g_a = 10;
int g_b = 10;
const int c_g_a = 10;
const int c_g_b = 10;
int main() {
int a = 10;
int b = 10;
cout << "局部变量a地址为: " << (int)&a << endl;
cout << "局部变量b地址为: " << (int)&b << endl;
cout << "全局变量g_a地址为: " << (int)&g_a << endl;
cout << "全局变量g_b地址为: " << (int)&g_b << endl;
static int s_a = 10;
static int s_b = 10;
cout << "静态变量s_a地址为: " << (int)&s_a << endl;
cout << "静态变量s_b地址为: " << (int)&s_b << endl;
cout << "字符串常量地址为: " << (int)&"hello world" << endl;
cout << "字符串常量地址为: " << (int)&"hello world1" << endl;
cout << "全局常量c_g_a地址为: " << (int)&c_g_a << endl;
cout << "全局常量c_g_b地址为: " << (int)&c_g_b << endl;
const int c_l_a = 10;
const int c_l_b = 10;
cout << "局部常量c_l_a地址为: " << (int)&c_l_a << endl;
cout << "局部常量c_l_b地址为: " << (int)&c_l_b << endl;
system("pause");
return 0;
}
|
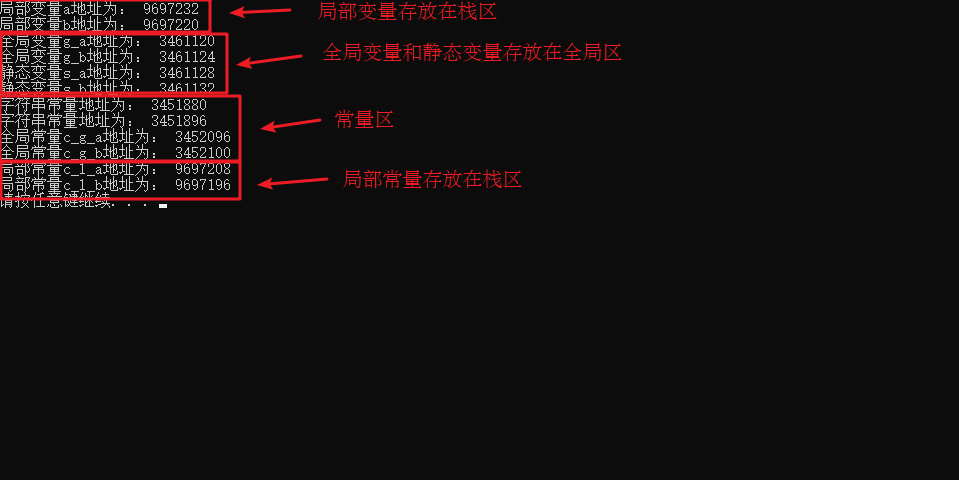
总结:
1.2 程序运行后
栈区:
- 由编译器自动分配释放, 存放函数的参数值,局部变量等
- 注意事项:不要返回局部变量的地址,栈区开辟的数据由编译器自动释放
示例:
1
2
3
4
5
6
7
8
9
10
11
12
13
14
15
16
17
| int * func()
{
int a = 10;
return &a;
}
int main() {
int *p = func();
cout << *p << endl;
cout << *p << endl;
system("pause");
return 0;
}
|
堆区:
- 由程序员分配释放,若程序员不释放,程序结束时由操作系统回收
- 在C++中主要利用new在堆区开辟内存
示例:
1
2
3
4
5
6
7
8
9
10
11
12
13
14
15
16
17
| int* func()
{
int* a = new int(10);
return a;
}
int main() {
int *p = func();
cout << *p << endl;
cout << *p << endl;
system("pause");
return 0;
}
|
总结:
- 堆区数据由程序员管理开辟和释放
- 堆区数据利用new关键字进行开辟内存
1.3 new操作符
示例1: 基本语法
1
2
3
4
5
6
7
8
9
10
11
12
13
14
15
16
17
18
19
20
21
22
| int* func()
{
int* a = new int(10);
return a;
}
int main() {
int *p = func();
cout << *p << endl;
cout << *p << endl;
delete p;
system("pause");
return 0;
}
|
示例2:开辟数组
1
2
3
4
5
6
7
8
9
10
11
12
13
14
15
16
17
18
19
20
21
|
int main() {
int* arr = new int[10];
for (int i = 0; i < 10; i++)
{
arr[i] = i + 100;
}
for (int i = 0; i < 10; i++)
{
cout << arr[i] << endl;
}
delete[] arr;
system("pause");
return 0;
}
|
2、引用
2.1 引用的基本使用
作用: 给变量起别名
语法: 数据类型 &别名 = 原名
示例:
1
2
3
4
5
6
7
8
9
10
11
12
13
14
15
16
17
| int main() {
int a = 10;
int &b = a;
cout << "a = " << a << endl;
cout << "b = " << b << endl;
b = 100;
cout << "a = " << a << endl;
cout << "b = " << b << endl;
system("pause");
return 0;
}
|
2.2 引用注意事项
示例:
1
2
3
4
5
6
7
8
9
10
11
12
13
14
15
16
| int main() {
int a = 10;
int b = 20;
int &c = a;
c = b;
cout << "a = " << a << endl;
cout << "b = " << b << endl;
cout << "c = " << c << endl;
system("pause");
return 0;
}
|
2.3 引用做函数参数
作用: 函数传参时,可以利用引用的技术让形参修饰实参
优点: 可以简化指针修改实参
示例:
1
2
3
4
5
6
7
8
9
10
11
12
13
14
15
16
17
18
19
20
21
22
23
24
25
26
27
28
29
30
31
32
33
34
35
36
37
38
39
|
void mySwap01(int a, int b) {
int temp = a;
a = b;
b = temp;
}
void mySwap02(int* a, int* b) {
int temp = *a;
*a = *b;
*b = temp;
}
void mySwap03(int& a, int& b) {
int temp = a;
a = b;
b = temp;
}
int main() {
int a = 10;
int b = 20;
mySwap01(a, b);
cout << "a:" << a << " b:" << b << endl;
mySwap02(&a, &b);
cout << "a:" << a << " b:" << b << endl;
mySwap03(a, b);
cout << "a:" << a << " b:" << b << endl;
system("pause");
return 0;
}
|
总结:通过引用参数产生的效果同按地址传递是一样的。引用的语法更清楚简单
2.4 引用做函数返回值
作用: 引用是可以作为函数的返回值存在的
注意: 不要返回局部变量引用
用法: 函数调用作为左值
示例:
1
2
3
4
5
6
7
8
9
10
11
12
13
14
15
16
17
18
19
20
21
22
23
24
25
26
27
28
29
30
31
32
33
|
int& test01() {
int a = 10;
return a;
}
int& test02() {
static int a = 20;
return a;
}
int main() {
int& ref = test01();
cout << "ref = " << ref << endl;
cout << "ref = " << ref << endl;
int& ref2 = test02();
cout << "ref2 = " << ref2 << endl;
cout << "ref2 = " << ref2 << endl;
test02() = 1000;
cout << "ref2 = " << ref2 << endl;
cout << "ref2 = " << ref2 << endl;
system("pause");
return 0;
}
|
2.5 引用的本质
本质:引用的本质在c++内部实现是一个指针常量.
讲解示例:
1
2
3
4
5
6
7
8
9
10
11
12
13
14
15
16
17
|
void func(int& ref){
ref = 100;
}
int main(){
int a = 10;
int& ref = a;
ref = 20;
cout << "a:" << a << endl;
cout << "ref:" << ref << endl;
func(a);
return 0;
}
|
结论:C++推荐用引用技术,因为语法方便,引用本质是指针常量,但是所有的指针操作编译器都帮我们做了
2.6 常量引用
作用: 常量引用主要用来修饰形参,防止误操作
在函数形参列表中,可以加const修饰形参,防止形参改变实参
示例:
1
2
3
4
5
6
7
8
9
10
11
12
13
14
15
16
17
18
19
20
21
22
23
|
void showValue(const int& v) {
cout << v << endl;
}
int main() {
const int& ref = 10;
cout << ref << endl;
int a = 10;
showValue(a);
system("pause");
return 0;
}
|
3、函数
3.1 函数默认参数
在C++中,函数的形参列表中的形参是可以有默认值的。
语法:返回值类型 函数名 (参数= 默认值){}
示例:
1
2
3
4
5
6
7
8
9
10
11
12
13
14
15
16
17
18
19
20
| int func(int a, int b = 10, int c = 10) {
return a + b + c;
}
int func2(int a = 10, int b = 10);
int func2(int a, int b) {
return a + b;
}
int main() {
cout << "ret = " << func(20, 20) << endl;
cout << "ret = " << func(100) << endl;
system("pause");
return 0;
}
|
3.2 函数占位参数
C++中函数的形参列表里可以有占位参数,用来做占位,调用函数时必须填补该位置
语法: 返回值类型 函数名 (数据类型){}
示例:
1
2
3
4
5
6
7
8
9
10
11
12
13
|
void func(int a, int) {
cout << "this is func" << endl;
}
int main() {
func(10,10);
system("pause");
return 0;
}
|
3.3 函数重载
3.3.1 函数重载概述
作用: 函数名可以相同,提高复用性
函数重载满足条件:
同一个作用域下
函数名称相同
函数参数类型不同 或者 个数不同 或者 顺序不同
注意: 函数的返回值不可以作为函数重载的条件
示例:
1
2
3
4
5
6
7
8
9
10
11
12
13
14
15
16
17
18
19
20
21
22
23
24
25
26
27
28
29
30
31
32
33
34
35
36
37
38
39
40
41
|
void func()
{
cout << "func 的调用!" << endl;
}
void func(int a)
{
cout << "func (int a) 的调用!" << endl;
}
void func(double a)
{
cout << "func (double a)的调用!" << endl;
}
void func(int a ,double b)
{
cout << "func (int a ,double b) 的调用!" << endl;
}
void func(double a ,int b)
{
cout << "func (double a ,int b)的调用!" << endl;
}
int main() {
func();
func(10);
func(3.14);
func(10,3.14);
func(3.14 , 10);
system("pause");
return 0;
}
|
3.3.2 函数重载注意事项
示例:
1
2
3
4
5
6
7
8
9
10
11
12
13
14
15
16
17
18
19
20
21
22
23
24
25
26
27
28
29
30
31
32
33
34
35
36
37
38
39
|
void func(int &a)
{
cout << "func (int &a) 调用 " << endl;
}
void func(const int &a)
{
cout << "func (const int &a) 调用 " << endl;
}
void func2(int a, int b = 10)
{
cout << "func2(int a, int b = 10) 调用" << endl;
}
void func2(int a)
{
cout << "func2(int a) 调用" << endl;
}
int main() {
int a = 10;
func(a);
func(10);
system("pause");
return 0;
}
|